DIY Project List
I've been told that I'm the queen of cheap shopping. I'm going to combine that with my average craftiness and hopefully make some really great DIY projects.
Here is the list so far:
Pocketfold Invitations w/ embossing - complete, but no embossing
Bridesmaid Bracelets - complete
We Do letters - complete
Table Numbers - complete
Guest Book - complete
Favors - making 9/15
Programs - complete
Menu's - complete
Cardbox - complete
Thank You & Favor Signs - complete
Reserved Table Signs - complete
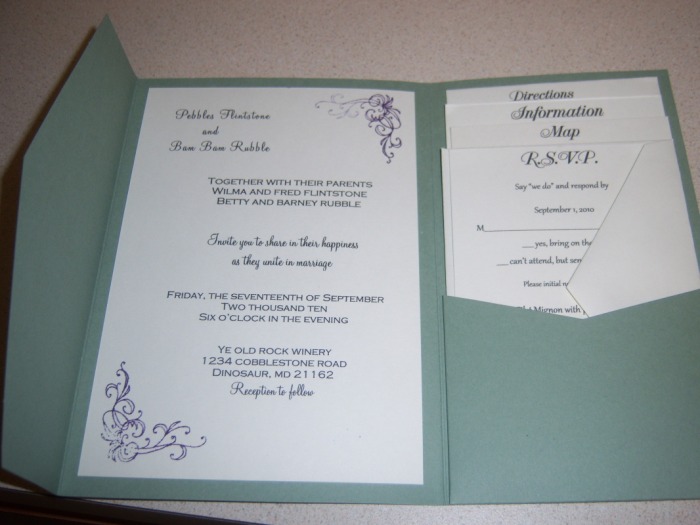
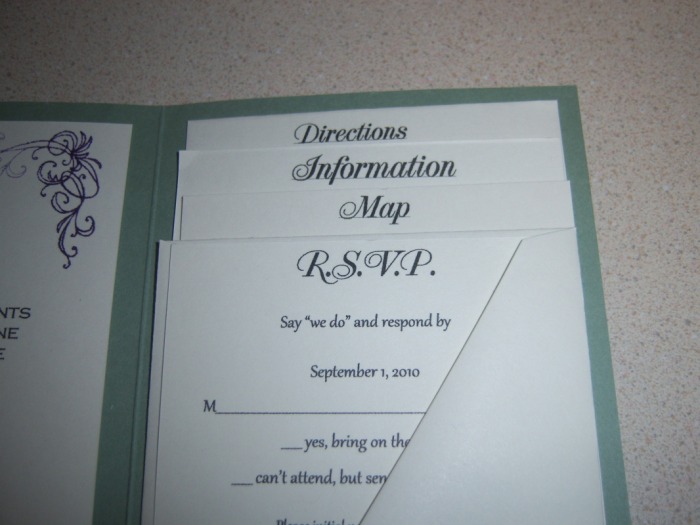
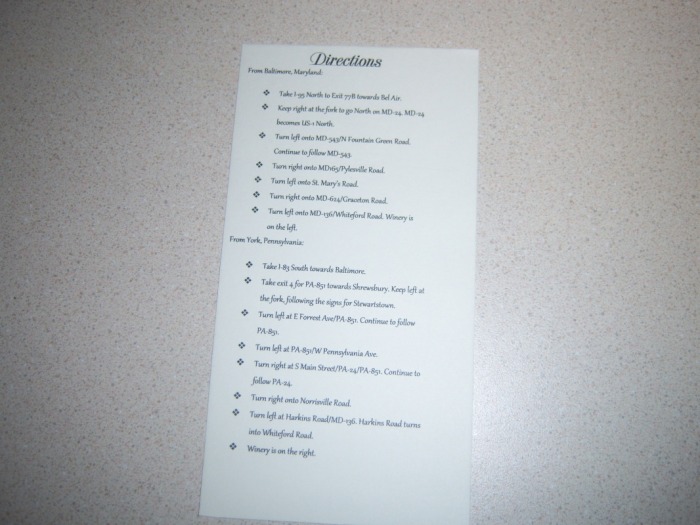
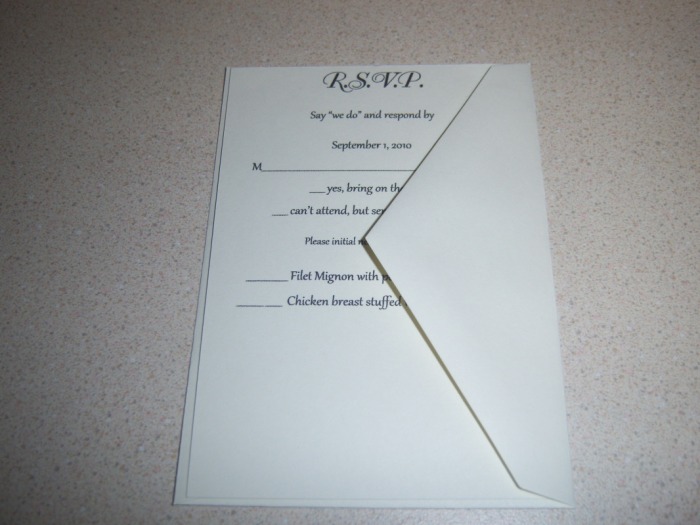
Pocketfold Invitations
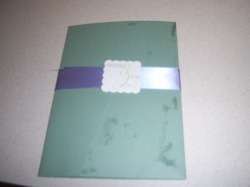
Ignore the wet marks on the pocketfold. I'm the idiot that didn't think to wipe off the counter before I started using it to take pictures.
These are Signature 5x7 Pocketfolds from Cardsandpockets.com. I purchased them in the color Pine, along with pre-cut invitations and inserts in cream. The purple ribbon comes from Anna Griffin Wedding Studio line and the monogram was made for me by a seller on etsy.com. I used a scalloped hole punch to get the design.
I still need to get the words Directions, Information, Map and RSVP to line up better because I'm OCD like that, but for a mock up, I'm rather proud of myself.
Hopefully by next week or so I'll include the templates I used and a how-to guide on my blog.
Some directions: http://mdbudgetbride.blogspot.com/2010/07/invitations-finale.html


Bridesmaid Bracelets
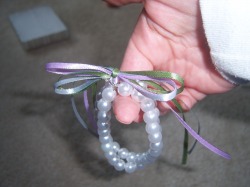
This was definitely not as easy as I thought it was going to be. It took me quite a few tries to get the bracelets to look right and stay attached properly.
I still need to upload the directions for these, but they are finally done!
I still need to upload the directions for these, but they are finally done!
Flower Girl Necklace
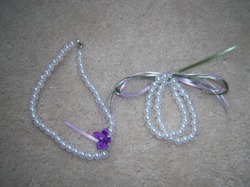
I still have a TON of pearl beads left so I figured I would use them up by making necklaces for all of the bridesmaids and the flower girl too. I made one for the flower girl and then started on the next one. It didn't work out, so I tried again and it turned out like crap again. I gave up and decided that I'll either buy necklaces for the bridesmaids or they just won't have them. Then I attached the embellishment flower to the necklace for the flower girl and called it a day!
We Do Letters
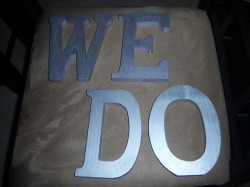
I purchased the letters, paint and paintbrushes from Walmart. Tom decided that he wanted We Do instead of I Do.
Like I had said previously, I thought I was going to need to purchase sandpaper for these letters, but it turned out that I didn't. I accidentally painted one of them purple before remembering that they were supposed to be silver. I added a coat of silver to the purple and it looked pretty neat and I knew it would save me from doing 5-7 coats of just silver so I painted them all purple, let it dry and then did 3 more coats of silver on each.
I'm debating on whether or not I want to add any rhinestones or just leave them the way they are.
Table Numbers
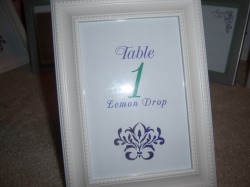
This has been an adventure from the beginning. I knew that I didn't want basic table numbers. I found these frames at the Dollar Store (I bought 10 but apparently misplaced one somewhere) a while ago.
My first thought was to name the tables after things that we liked (movies, foods, places, etc.) but quickly realized that someone might be offended sitting at the Grinch table. My next idea was to name the tables after different types of wine; which went out the window when we changed the venue.
Plan 3 was that its only fitting to continue with the alcohol thing, since we're getting married at a bar. So we decided on shot names. And then realized that most shots do not have wedding appropriate names so finally we agreed on names of drinks.
We chose: Lemon Drop, Screwdriver, Mojito, Mai Tai, Cosmopolitan, Pina Colada, Gin & Tonic, Martini, White Russian, Margarita.
More Table Things
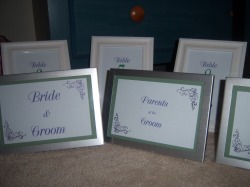
There are 3 tables near the stage at the restaurant that kind of face out to the rest of the bar. I thought it made the most amount of sense to have us sit at the middle table and have our parents on either side of us. I don't think we're going to do assigned seating so I wanted to reserve these tables. At Walmart today I found 3 silver 5x7 frames for $1.50 each. I bought them and printed on 4x6 blank index cards (total money saver!!!) and used glue dots to adhere them to green cardstock. They looked kind of plain and lonely so I used the stamp that will go on our invites for the corners.
I'll take individual pictures before I put them up for sale, but they say: Bride & Groom, Parents of the Groom and Mother of the Bride.
I'll take individual pictures before I put them up for sale, but they say: Bride & Groom, Parents of the Groom and Mother of the Bride.
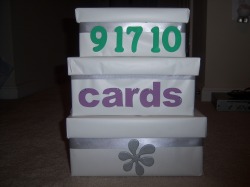
Card Box Parts
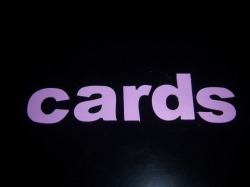
I purchased 3 paper mache nesting boxes and had the idea to cover them with silver or white wrapping paper and use chipboard letters to spell out Cards and Thank You on them. Then I found chipboard numbers and thought it would be even more neat to include the date. Well, I found out today while I was painting the chipboard letters that the Thank You is too large to fit across the largest box, so I came up with a new idea for that.
Here are the purple chipboard letters that will be attached the middle box. The numbers came in white and I think I will leave them that way. I need to go and get the wrapping paper next!
Here are the purple chipboard letters that will be attached the middle box. The numbers came in white and I think I will leave them that way. I need to go and get the wrapping paper next!
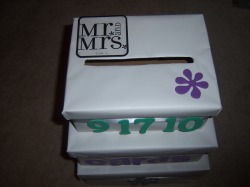
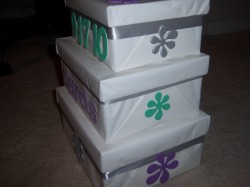
Completed Cardbox
Its not perfect and I probably won't make any money attempting to resell it, but its done and I'm happy with it. I'll link directions for how to make it here soon.
The next picture is the top view. I found the Mr. and Mrs. tag in the gift aisle. The picture after that is the side view.
The next picture is the top view. I found the Mr. and Mrs. tag in the gift aisle. The picture after that is the side view.
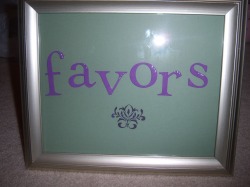
Thank You & Favor Signs
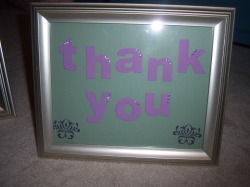
Since Thank You didn't fit, I had to come up with something to do to use those letters. So, I decided that I would put the letters onto cardstock and into a picture frame and put that frame next to the card box. Then I got the bright idea to do that for the favors too, but the stupid chipboard letters only came with one r and one s so I need to wait until my order of them comes in to finish the word Favors.
Guest Book
This was one of my first wedding purchases. I went to Michael's craft store with a 40% off coupon and ended up finding this guest book on sale for $8.99. Its from the Martha Stewart Water Lily collection.
You can put a colored piece of paper behind the water lilies, but its an odd size. Hopefully I can find a sheet of cardstock that big!
The guestbook has 20 openings for photos. I'm going to use some regular pictures of us and the others will be our engagement pictures.
You can put a colored piece of paper behind the water lilies, but its an odd size. Hopefully I can find a sheet of cardstock that big!
The guestbook has 20 openings for photos. I'm going to use some regular pictures of us and the others will be our engagement pictures.
Favors - Black Bottom Cupcakes!
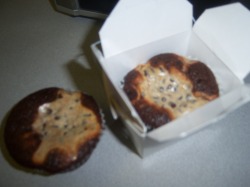
Yummy, yummy, yummy. The first dessert that I ever made for Tom was black bottom cupcakes. He had never heard of them and they are one of my favorite desserts, so that needed to change quick.
I'm one of those horrible guests that will throw away a favor if its personalized or isn't edible. Sorry, but I have no desire to have a shot glass with your name on it. Why? Well, because its not my name. Actually, thats not even true. I don't really like stuff with my name on it either.
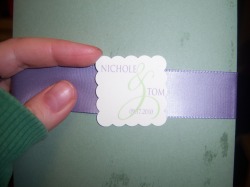
So I figured that edible favors would be the best idea. I bought Chinese take out boxes from a local knottie and I'm going to use a monogram made for me by an etsy seller to put on the sides of the boxes.
I'm one of those horrible guests that will throw away a favor if its personalized or isn't edible. Sorry, but I have no desire to have a shot glass with your name on it. Why? Well, because its not my name. Actually, thats not even true. I don't really like stuff with my name on it either.
So I figured that edible favors would be the best idea. I bought Chinese take out boxes from a local knottie and I'm going to use a monogram made for me by an etsy seller to put on the sides of the boxes.
Programs
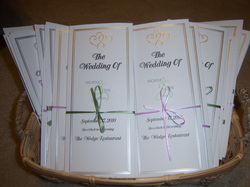
I wasn't sure if I wanted to have programs or not. I kind of think they are just a waste of paper, but it was something that Tom wanted. I picked up a pack of 50 programs from AC Moore with another 40% off coupon and figured for $6 it was worth the expense.
I still haven't figured out what all I want the programs to say, so I'll upload a picture once they are complete.
I still haven't figured out what all I want the programs to say, so I'll upload a picture once they are complete.
Menu's
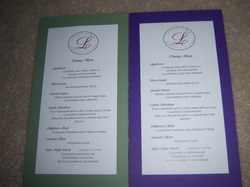
Even though we are going to have our guests choose their entree selections on the RSVP card, I wanted something else colorful on the tables, so I decided I was going to make menu's. When I purchased the invitation pieces from cardsandpockets.com, they had cardstock on sale too. I picked up purple and green cardstock. That will be cut to a 5x7 piece and the menu will be adhered to it on white 4x6 cardstock.
Seating Chart
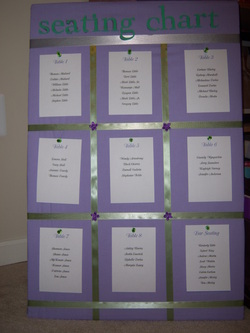
I had no idea what I wanted to do for a seating chart. I knew that I needed to have one because the restaurant isn't really set up for a wedding and I didn't want guests wandering around trying to figure out where they were seated.
Finally I came up with this. Its pretty basic, a piece of plywood with a piece of foam board stapled to it. Then fabric stapled around that with some ribbon. The letters are chipboard letters I painted. I wanted cuter push pins to keep the tables on there, but I couldn't find any and it was too late to order ones online.
Finally I came up with this. Its pretty basic, a piece of plywood with a piece of foam board stapled to it. Then fabric stapled around that with some ribbon. The letters are chipboard letters I painted. I wanted cuter push pins to keep the tables on there, but I couldn't find any and it was too late to order ones online.
Monogram 1
I had two monograms made for me by etsy.com sellers. The monogram that is on our invites will also be on our programs. The etsy seller for this was aidencooperdesigns. Her link is here: http://www.etsy.com/shop/aidencooperdesigns I paid $3 for this one.
I need to get a better picture of this soon.
I need to get a better picture of this soon.
Monogram 2
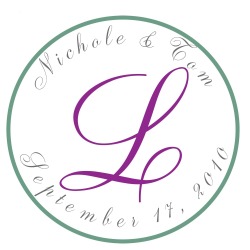
I'm going to use this monogram on our menu's and on the favors. This was made by etsy seller WeddingMonograms. Here is her link: http://www.etsy.com/shop/WeddingMonograms
I paid $2.50 for this a while ago, but I believe she's raised her prices to $5 per monogram. Still not a bad price!
